The Boom Brake Owners Manual has more detailed information about installing your new Boom Brake, but this should help you figure out if and how the brake will work on your boat. And you can always call us if you have any questions.
Boom Break Basic Set Up
The Brake is attached to the boom where the vang normally attaches. A line is run from an attachment point at or near the aft lower chainplates, through the Brake and back down to a turning block near the opposite chainplate, and back to the cockpit. You must be able to adjust the Brake line tension from the cockpit. There are two ways to do this. Either use a line stopper and winch, or use a block and tackle (low friction, 4 to 1, for the small 250 series, 5 or 6 to 1 for the 500 series, 750 series will need a winch). Hand tension is NOT enough. Although it is slightly better to run the line back to the cockpit on both sides, it is usually not worth the extra cost. Normally, the brake line is run back to the cockpit only on one side.
Brake Line Diameter
Note that different line diameters can be used in each Brake. larger line sizes generate more friction. The specifications provide a good starting point. Switch to a larger size if the braking effect is too little, or a smaller size if it is too much. some lines will need to be washed to remove silicone residue from the manufacturing process.
Locate Deck Attachment Points

Use the following criteria to select the ideal location for the deck attachment points:
1. As far outboards from the mast as possible.
2. Within one foot (30cm) fore or aft (closer is better) of the aft chainplate.
3. Clear of walkways, if possible.
The most common locations, in order of preference, are:
A. The aft lower chainplates if they are set inboards.
B. A car on an inboard genoa track if it extends to the chainplates.
C. A deck-mounted through-bolted pad eye, or the toerail.
D. A pad eye at the corner of the cabinhouse, if a high cabinhouse with narrow decks, like on Valients, Pacific Seacrafts, or Island Packets. Most boats have several possible attachment points. Locate several possibilities, then move on to locating the boom attachment point.
Chainplate Attachments
If using the aft lower chainplates, you can directly attach the brake line and turning block to the chainplate if a U-Bolt style. Never attach anything to a toggle or tunrbuckle in a way that can pull it apart. If your chainplate is a conventional metal strap or bar inserted through the deck, measure the clevis pin. Use a shackle that has the same pin diameter as the clivis pin if your chainplate is parallel with the centerline of the boat. If you chainplates run athwartships, or 90 degrees to the centerline, use a cast SS eye bolt in place of the clevis pin. We can supply these parts.
Locate Boom Attachment Point
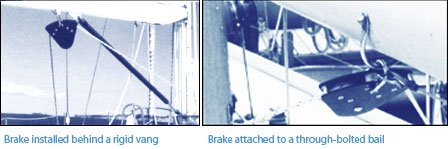
The Brake will be about 1/4 to 1/3 the boom length back from the mast. More precisely, the distance from the mast to the boom attachment point will be about the same as the distance from the mast to the deck attachment. Use the existing boom vang attachment point or bail as a starting point. If the boat is fitted with a rigid vang, the Brake normally is aft of the vang.
Check Line Tension
Set the boom height to the lowest normal sailing position and snug up the vang. Locate the boom on the centerline. Run a 1/8-inch to 1/4-inch line through the potential boom attachment point. Tie or tape the block or shackle to the boom if needed. Then run the line down to the potential deck attachment points. Snug up the line and secure it 9with tape if needed) Now swing the boom out, and check the tension on the line. The line tension should not change significantly as the boom swings through its arc. As a rough guide, the tension should not change more than 4 inches for the 250 series, 6 inches for th3 500 series, and 9 inches for the 750 series. The line should become looser, not tighter, as the boom moves away from the centerline.
In general, by moving the boom attachment point back or the deck attachment point outboards, you will make the line looser as it moves away from the centerline. It may take a few tries to find the best combination. You may find that, if you have any kind of a cabinhouse, the Brake line will rub against it or the handrails at some point. This is often unavoidable. Bear in mind that the Brake slides along the line and the line itself does not move significantly. The line will not cause significant chafe. Teak handrails will need metal chafe guard strips.
Specifications: Brake, Hardware, and Line
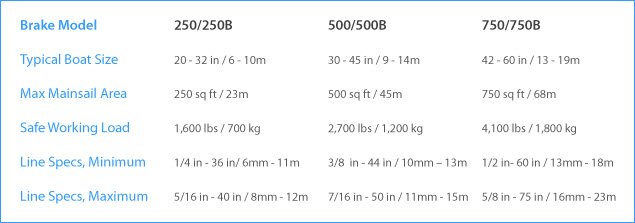
These specifications are for conventional, moderate displacement monohulls, and provide a rough indication of which Brake to use. Heavy displacement or offshore-intended sailboats should move up to the next larger Brake if near the maximum sail area. The BB250, BB500, and BB750 are used with rigid vangs, in a soft vang applications with 2 attachment points (bails) on the boom, or if there is no vang. The BB250B, BB500B, and BB750B have an additional shackle at the bottom of the Brake. They are used with “soft” (block and tackle) vangs. The Brake is attached to the vang bail on the boom. The vang is shackled to the bottom of the brake. The Safe Working Loads are for the respective Brake and any mounting hardware used to secure the Brake or run the line back of the cockpit. Any parts you use should follow these SWL recommendations.
The Line Specs are given for both the minimum and maximum size we normally recommend. Lengths given are normally enough to run the line form the chainplate, to the Brake, back down to the other chainplate, and back to a line stopper and winch in the cockpit. Add 50 percent to the length if you intend to run back to the cockpit on both sides. If your boat is towards the smaller end of the mainsail area / boat size range, then you probably will use the minimum line specs, and if your boat is closer to the maximum mainsail area / boat size, use the maximum line size. 7/16” – 11 mm line is often a tight fit with the 500 series. It helps to have a messenger loop whipped onto the end of the line, to pull the brake line through. Also, note that 9/16” line can be used with 750 rake with boats in the middle of the specs. If the line provides too much friction, you may need to go down one line size. Too little friction, go up one line size. Finally, some lines may hve silicone residue or other lubricants remaining from the manufacturing process. Wash the line with a load of clothes.